How to create a question bank and upload the questions and review the paper
Step – 1
Select the third option “Question Bank” from the left side menu provided and click on “Create Question Bank” tab.
Step – 2
When you click on Create Question Bank, a pop-up will appear asking for the question bank name and code (these should be unique). Enter the details accordingly and save the page.
Adding Questions Manually
Step – 3
After clicking on Save in previous step a user is required
to click on “Three Dots” which are
provided just below “Actions” column.
Once user clicks on those three dots presented, a dropdown
menu of
- Add Questions
- View/Review Question
- Upload Question
- Rename
- Archive
- Download
- Clone
Will pop-up and after that a user is required to click
on Add Questions
Step – 4
Once user clicks on Add Question, User will be directed
to add questions page where he/she will
get a Dropdown Menu of numerous options namely
- Multiple Choice Single Answers
- Multiple Choice Multiple Answers
- True or False
- Essay Type Descriptive Answers
- Short Answers
- File Upload
- Typing Test
- Likert Scale
- Calculated Numeric
Step – 5
After selecting the type of question a user is required
to enter the passage provided by the client in “PASSAGE GROUP” section if the type of Questions are
- Essay Type Descriptive Answers
- Short Answers
Step – 6
Topic: General and Others According to
the requirements of the Candidate.
Step – 7
BTL stands for Bloom’s Taxonomy Level, which has various options
- Create
- Evaluate
- Analyze
- Apply
- Understand
- Remember
Step – Extra Point
Severity here refers to difficulty level.
Step – 8
Marks & Negative Marking
Step – 9
CLO (Course
Learning Outcome) & LOC (Learning
Outcome)
( Optional )
Uploading the Question Paper in Bulk
Step – 10
User can also upload the question paper in bulk, in the action menu of the question bank, a user is required to click on "Upload Question."
Step – 11
Now the pop-up will open, where you have to firstly download the "Sample File" provided under the upload button to where you can enter the question's details in bulk, then you can browse or drag the formatted excel file that you have made, select the formatted excel sheet containing their questions to upload and click on "Upload" button the file to push it to the portal.
Step – 12
After downloading the excel file, open it, and the user is required to fill in the details in Sheet 1, i.e., "Question," for your reference data.
Step – 13
After entering Sheet 1, the user is required to fill in the details in Sheet 2, i.e., "Options" for your reference data.
Step – 14
After entering Sheet 2, the user is required to fill in the details in Sheet 3, i.e., "Passage" (Optional) for your reference data.
Marking as Review Process
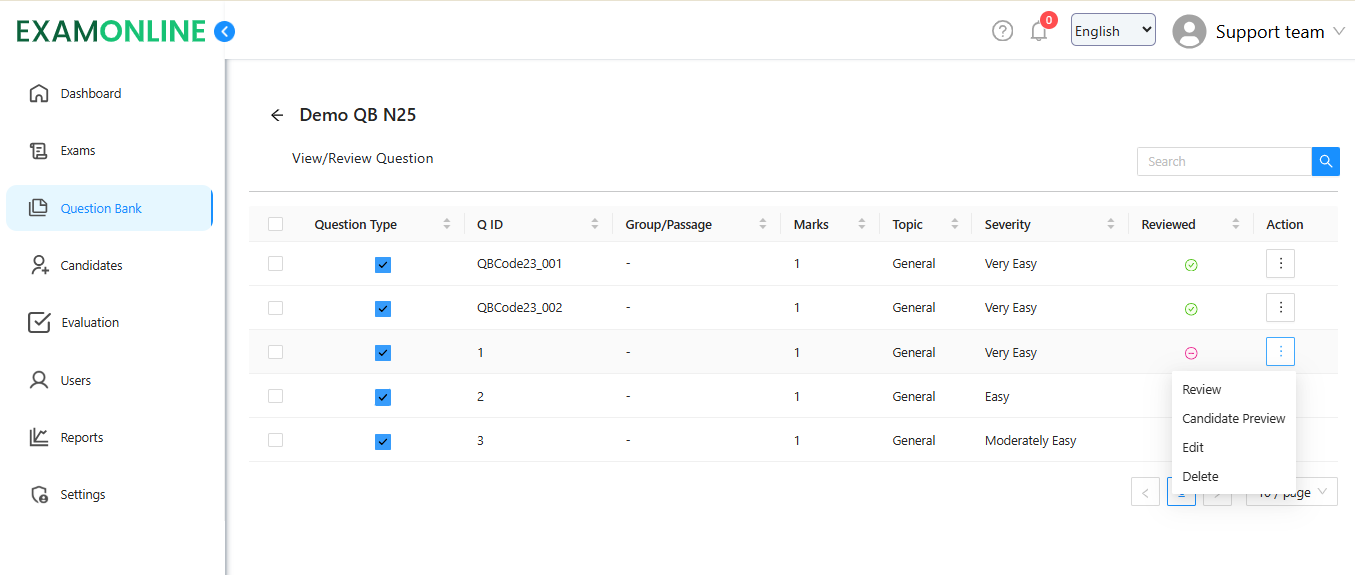
The user needs to log in with their credentials, click on the Question Bank, then click on the three dots on the question they need to review. Four options will appear

Review
-
Candidate View
-
Edit
-
Delete
For reviewing:
-
Click on Review. The question will open along with its options.
-
If there are no errors in the question, click on Mark as Reviewed.
-
If you find any errors, click on Edit. You will be redirected to a page where you can edit the question and its options. After editing, before marking as reviewed, click on Candidate View to see how the question will appear to the candidate on the exam portal.
-
If everything looks correct, click on Mark as Reviewed and then Next to view the next question.
Hence the Question Bank is Created.
Related Articles
How to Create an Exam
Step – 1 You can access the 'ExamOnline Administration Portal' by logging in with the provided credentials. Configuring an Exam Step – 2 Choose the second option, labeled 'Exam,' from the menu on the left-hand side, and then click on "Create Exam" ...How to Associate Questions to the exam
Note: This step should be done after the creation and review of the Question Bank. Step - 1 To associate questions with the exams, click the 'Plus Icon' to expand the tabs, and then navigate to the 'Questions' tab. Step - 2 Now the “Sections & ...How to upload questions in bulk
Step – 1 After logging in to the "Exam Online Administration Portal" with the shared credentials, You have to first create a question bank. (Note: You can check the process in another article, by clicking Create a Question Bank. ) Step – 2 Navigate ...How to create a question bank
Step – 1 After login in to your examonline admin interface Select the Third option “Question Bank” from the Left side Menu provided and click on “Create Question Bank” tab. Step – 2 When you click on Create Question Bank, a pop-up will appear asking ...How to View/Review the Questions in a Question Bank
Step – 1 Clicking on the option of the question bank, then selecting 'View/Review Questions' and reviewing the questions. Step – 2 Now new page will open where you can View/Review Question which you have uploaded, then a user is required to click on ...